The Azure WebApp Configuration task reads VSTS variables and adds those as AppSettings and ConnectionStrings to an Azure WebApp. The task also supports Slot Settings. The task can be linked to a web.config to validate if all AppSettings and ConnectionStrings in the web.config exists as VSTS variable.
Task can be found in the marketplace and added to your VSTS account. The code is open source and can be found on GitHub.
Naming convention
The task uses naming conventions in the VSTS variables to deploy appsettings and connectionstrings to an Azure WebApp. If you like as a Slot Setting. The value of the VSTS variable is used for the value for the appsetting or in case of a connectionstring, the connectionstring.
The following naming conventions rules are supported:
- The name of a variable for an appsetting must start with appsetting.
- The name of a variable for a connectionstring must start with connectionstring.
- The type of database should be added in the namingconvention as stated in the following table.
- For a slotsetting the convention .sticky must be used.
The table below shows some examples:
| Type | Example VSTS variable name |
| appsetting | appsetting.mysetting |
| appsetting with slotsetting | appsetting.mysetting.sticky |
| connectionstring to SQL Server | connectionstring.myconnectionstring.sqlserver |
| connectionstring to SQL Azure | connectionstring.myconnectionstring.sqlazure |
| connectionstring to custom | connectionstring.myconnectionstring.custom |
| connectionstring to MySQL | connectionstring.myconnectionstring.mysql |
| connectionstring with slotsetting | connectionstring.myconnectionstring.sqlserver.sticky |
Steps to use and configure the task
- Install the task in your VSTS account by navigating to the marketplace and click install. Select the VSTS account where the task will be deployed to.
- Add the task to your release by clicking in your release on add a task and select the Utility category. Click the Add button on the Apply variables to Azure webapp task.

- Configure the task. When the task is added the configuration will look like this:

All yellow fields are required.
– Select an AzureRM subscription. If you don’t know how to configure this. Read this blogpost.
– Select the web app name.
– Select the resourcegroup.
– If you want to deploy to a Deployment slot, check the Deploy to Slot checkbox and select the Slot.
– If you want to validate the VSTS variables against the appSettings and ConnectionStrings in the web.config of the application you deploy, then select the web.config. Otherwise uncheck the Validate variables checkbox.
– When you want validation, you can choose how the task should behave when it finds incorrect variables. Default behavior is that the task will fail with an error. This results in a failed Release and the variables will not be deployed.
The other validation result action is to only get a warning. The variables will be deployed to Azure.
– By default all existing AppSettings and ConnectionStrings in Azure are overwritten by the variables in the release. When you don’t want this, but you want to preserve your appsettings or connectionstrings in your WebApp, then uncheck the Overwrite existing configuration checkbox. - The web.config of your application is not being used to deploy variables to Azure. If you have configured validation, the keys of the appSettings and the names of the ConnectionStrings are used to validate if there are VSTS variables available for these settings. The web.config in this sample looks like this:

- Add variables that match the names of the variables in the AppSettings and ConnectionStrings. Also apply the namingconventions for the VSTS variables.

- Instead of configuring Release variables as in step 5, you can also configure Environment variables. This step shows you how you can configure the release in VSTS to support multiple environments. In this sample each environment will have the same appsettings and connectionstrings. But the value of those differentiate.
After creating the Environments, configure variables per environment. Just like step 5, just add the keys and the values.
To see the Environment variables at a glance, select the Environment variable view as you can see in the following picture:
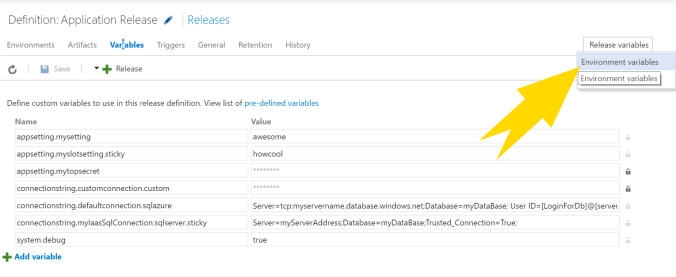
When you have configured all Environments, you will see an overview like the following:

- When you run the release, the settings will be deployed to Azure. In this sample it looks like this:
Note that the hidden value in VSTS is visible now in Azure.


This is great. We were in the middle of developing something ourselves (but not quite as clean as this). This is one item missing off the standard list of tasks that Microsoft should really be supplying. The only thing that we are missing (which we now script separately is enabling of websockets).
LikeGeliked door 1 persoon
The documentation for connection strings appears to be the wrong way around it should be connectionstring.myconnectionstring.sqlazure etc.
LikeLike
Thanks. I Will fix it as soon as possible when I’m back from holiday 😊
LikeLike
Fixed! (in the blogpost) The documentation of the task itself will be updated with the next release.
LikeLike
Great for web.config files, I’d like to see it be able to update WebJob app.config files too.
LikeGeliked door 1 persoon
Thanks. This task does not change the web.config. It’s updating appsettings and connectionstrings in Azure. So if you like your webjob to make use of these Azure AppSettings and Connectionstrings, you have to update the code in the WebJob. Make use of CloudConfigurationManager instead of ConfigurationManager. Like: CloudConfigurationManager.GetSetting(“mysetting”). Does this help you?
LikeLike
This is great, the only thing I cannot work out is how to manage settings that differ across environments.
My first environment could be a test environment that uses different databases to the others, the others may be regional deployments where some settings as common and some are environment specific.
Do you have a pattern for solving this?
LikeLike
Thanks Philip,
The solution for your problem is to use Environment variables instead of Release variables.
The release variables can be accessed by clicking on variables in Release.
Environment variables can be accessed by clicking the Environment of your choice and select “Configure Variables”.
Though all Environment variables can be seen by clicking on variables in the Release and than click on Release variables at the right. Now you can select Environment variables.
Does this help you?
LikeLike
Philip, I’ve updated this blogpost to show how you can manage settings across environments in step 6.
LikeLike
Currently this fails for Azure Functions settings with following error: ##[error]Exception calling “AddRange” with “1” argument(s): “Value cannot be null.
I’ve validated that you can set app settings using powershell, so I’m not sure what’s the underlying issue is.
LikeLike
Hi Pascal
Nice work by the way I have a question, How do i update one of the appsettings with pre-defined variables?
I would like to have an appsettings called “ReleaseVersion” and i want to update that value with pre-defined variable $(Release.ReleaseName)
any hint to achieve this scenario?
Thanks.
LikeLike
Although you will still need a second variable, you could use Jesse Houwings VSTS task to copy the value of the Release.ReleaseName variable to the appsetting.Release.ReleaseName variable. https://marketplace.visualstudio.com/items?itemName=jessehouwing.jessehouwing-vsts-variable-tasks. Hope this helps.
LikeLike
Actually, i got this error :
##[error]Exception calling “AddRange” with “1” argument(s): “Value cannot be null.
Do you know the cause of this error ?
Thank you
LikeLike
Hi,
Quick question, if we have a single release that deploys say a front end and back end web app is there a way we could have this in a single Release and assign some app.settings to say back end and some to front end?
Cheers
Si
LikeLike
Yes you can do this using multiple environments. One environment per webapp. You can have variables per environment.
LikeLike
First of all, this is a Great Task!
Second, I have some strange issue, I get this error :
“The version of this BuildAgent is not supported. Current Version: 1. This task needs at least build agent version 2.105.0” although I’ve updated my agent to version 2.136.1.
The task succeeds only if I install a new agent.
Do you have an idea why it’s happening?
LikeLike
There is a check in the source code on this, which was correct a year ago, but probably not anymore: https://github.com/XpiritBV/Xpirit-Vsts-Release-Settings/blob/HostedAgentPS3/src/Xpirit.Vsts.Release.Settings/Apply.ps1
I can help you further after my holiday of 2 weeks
LikeLike
Pingback: Azure App Service Settings Task by Microsoft for Azure DevOps – Lassi Autio's Software Development Blog
Hi @pascalnaber ,
Since AzureRM is now obsolete, we migrated our build agents and our scripts to Az Powershell.
Do you plan to migrate this task to Az Powershell? You cant have AzureRM and Az Powershell on the same machine
Thanks
Source:
https://docs.microsoft.com/en-us/powershell/azure/azurerm/overview?view=azurermps-6.13.0
LikeLike