Previous blogpost coveres all steps to create a Docker Image from a .NET Core 2 WebAPI application on your local machine. After that, the Docker Image was pushed to Azure Container Registry (ACR). The deployment to Kubernetes pulled this Docker Image from ACR and runs a number of instances. All steps were executed manually. Let’s automate this using VSTS.
In this blogpost the Continuous Delivery of the .NET Core 2 WebAPI application is automated in VSTS. Next blogpost will show how to automate the Continuous Delivery of the Azure Resources. Also expect a blogpost on how to deal with application configuration that is environment specific for the running container.
Prerequisites
The solution should be available in Git sourcecontrol in VSTS
Two CI/CD pipelines
The infrastructure we need in Azure to deploy the Docker images to, Kubernetes, is infrastructure which is needed for all Docker images we deploy. This is the reason why this is a separate CI/CD pipeline in VSTS. The same for Azure Container Registry. This is infrastructure that doesn’t belong to one application.
The second pipeline is for the MyWebApi application, which results in a single Docker Image. If this application needs infrastructure like a CosmosDB database, then the deployment of this infrastructure would be included in this build. But for now the application is simple and doesn’t need any other resources of Azure.
Connection to Kubernetes from VSTS
VSTS needs to deploy to Kubernetes. To make this possible we are going to configure a Service Endpoint:
Navigate to the settings of the project by clicking the gear icon: 
Select tab Services.

Click “Add Service Endpoint” and choose for Kubernetes.

Connection name: any name you like
Server URL: You can find the URL in the Azure Portal on the Overview tab of the Azure Container Service. Copy the Master FQDN. Prefix this with https://
Kubeconfig: Open a command prompt and run the same command you use for connecting, with an extra argument –file:
az acs kubernetes get-credentials –resource-group=k8sdemo-containers –name=pn-k8sdemo-cs-dev-we –ssh-key-file “C:\Users\Pascal Naber\Documents\myacs\opensshprivatekey” –file ~/kubeconfig
Open the content of kubeconfig and copy this content in the Kubeconfig textbox.
Click OK and you have configured VSTS to have connection to your Kubernetes cluster.
Create a build for the .NET Core 2 application
Add a new Build definition.

Choose for template ASP.NET Core. This will give you a good start.
Give the build a meaningfull name.
Remove the Restore task because .NET Core 2 restores during the build already.

Click on Process and select the Hosted Linux Preview Agent Queue.

Because we use .NET Core 2, we need to add the “.NET Core Tool Installer” task as the first task. Configure the version on 2.0.0.
Because this demo doesn’t contain unittests, I’ve disabled the Test task for now.
Select the Publish task. By default the output is configured as follows: –output $(build.artifactstagingdirectory). Our Dockerfile expects the sources by default on “obj/Docker/publish”. We can do 2 things now. Change the source by passing a parameter while creating the container Image or change the output of the publish task to the path where Dockerfile expects it. I choose for the latter.

So change the output to: .\obj\Docker\publish. (note the Capital D! Linux is Case Sensitive)
Select the Version 2.* preview version because the other versions adds the name of the project to the output path. After this Uncheck “Add project name to publish path” for the same reason. We just want to have our output published to the path we configure. We don’t want to Publish Web Projects, so uncheck it and we don’t need a zip of the published projects.
To build the container image I’m going to use the Docker Compose file. A big advantage for this choice is that if you add more services to your solution. The build supports this already and does not need to be changed.
We need to change the docker-compose.yml file to have the full name of the Image that we need.

Add the Docker Compose task to the build definition.

Configure the Action. Select “Build Service Images”. To identify a version of the Image I like to use the BuildId as a version for the Image. To do this the textbox “Additional Image Tags” should contain: $(Build.BuildId). Also apply the Latest Tag to the Image. Do this by checking “Include Latest Tag”.
The image should also be pushed to Azure Container Registry (ACR). To do this add another Docker Compose task to the build.

Select the subscription where the Azure Container Registry is located. After this you can select the correct Azure Container Registry.

This time choose for Action “Push service images”. Add “$(Build.BuildId)” to the Additional Image Tags and check Include Latest Tag.
Now we have to prepare the Deployment of the Image to Kubernetes with the Deploy.yml file. Remember from the previous blogpost that we have configured a fixed version for the Image to deploy:

Because the Image that Kubernetes has to deploy has the version of the buildId, we need to change this fixed number to the dynamic BuildId. Change the file to:

Now we need to replace this placeholder with the BuildId. To do this I’m using the task of Guillaume Rouchon which can be found here in the marketplace. Add this task to the build definition.

Configure the root directory. Choose the directory where the Deploy.yml file is located. and configure the Target files. Type the name of the file: “Deploy.yml”.

Click on the Variables tab and add a variable with the name of the placeholder. In this case “ContainerVersion”. The value should be: “$(Build.BuildId)”.
Finally we have to create a build artifact of the Deploy.yml file. This way the Release, that we are going to create, can use this file.

Configure the Source Folder, Contents and the Target Folder. Target should be configured as: “$(build.artifactstagingdirectory)”.
Queue the build.
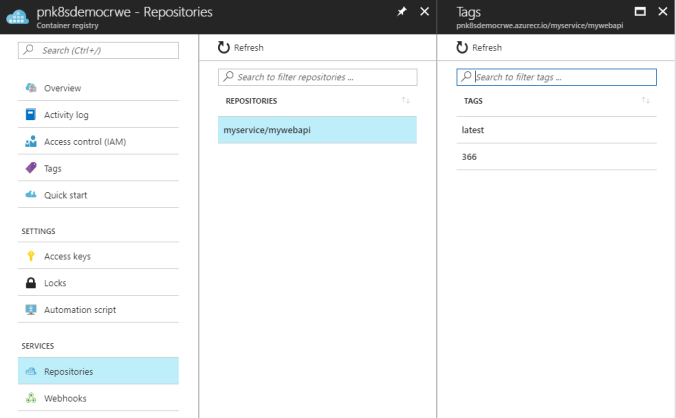
The Deploy.yml file should be available as Artifact and Azure Container Registry should contain the Image with both a version and a latest tag.
You can configure the trigger of the CI build so it runs whenever the sourcecode is pushed.
Create a release for the deployment to Kubernetes
Make sure you have read the prerequisite in this blogpost: Connection to Kubernetes from VSTS.
First step is to Add a new release.

This time choose for template: “Empty”.
Give the Environment a meaningfull name.
Add the CI Build as Artifact.

Add the “Deploy to Kubernetes” task and select it.

Select the Kubernetes Service Connection which you have added as explained in the prerequisite.
Select the Azure subscription that contains the Azure Container Registry.
Select the Azure Container Registry
The task is able to update the secret that contains the connection to Azure Container Registry. This is convenient so add the name of the secret to Secret name.

Select the “apply” Command
Check “Use Configuration files”
Select the Deloy.yml file at Configuration File.
Give the release a meaningfull name and queue a Release.
You are now able enable the Continuous Deployment trigger. This ensures a new release is triggered as soon as the CI Build is available.
If you have finished this you have a complete CI/CD pipeline with .NET Core 2 and Docker containers, which are deployed to Kubernetes using Azure Container Registry. As soon as the code is changed in Git, the build is fired which creates a new Container Image. The build triggers the release and the Container Image is deployed to Kubernetes with a rolling update. So there is no downtime! How cool is that.
